Azure DevOps CI/CD pipeline for SAP Hybris and Commerce
Continuous Integration
In this article i am going to talk about CI/CD process for deploying SAP Hybris and Spartacus to end systems.
One of the biggest challenge anyone faces with respect to deployment is lack of documentation as most them talks about pipelines using Jenkins. In order to setup there are some pre-requisites as you need to have latest zip files from SAP.
In this case i am using below files.
- CXCOMINTPK200500P_0–80005540.ZIP
- CXCOMM201100P_0–70005693.ZIP
- cloudhotfolder_2005.zip
- Linux Server → Best is either Ubuntu 18.04 or RHEL 7
Make sure you add these 3 zip files onto your AzureDevOps code repo.
Now lets start creating CI Pipeline using AzureDevOps. I have checked in my code and with new zip files.

Now lets start creating a new Pipeline → click on New Pipeline → click on “use classic editor” → On a next screen it is going to ask source of your code → Select appropriate Project, Repository & Branch.

Click on Continue → Select a template → empty job.

Now few Important things before you start adding the tasks, Under pipeline please select agent as “Ubuntu-18.04”. The reason behind selecting Ubuntu vs Windows as when i tried running the build using Windows-2019 agent it was taking ~23mins to run however when i selected Ubuntu 18.04 agent entire job got completed in ~15mins (max).

Now lets adding the tasks, as a part of SAP Commerce Cloud build below are the steps which we need to add.
- Extract zip files
- Java 11 installation
- Install Hybris Commerce binaries.
- Prepare Hybris Commerce environment.
- standard Hybris Commerce full build.
- Install Yarn 1.15 or higher
- Initialize the Hybris Commerce system.
- Zip Spartacus Dist folder.
- Build to SAP Commerce Cloud.
- Initialize the JUnit Tests.
- Run Integration Tests.
- Run SonarQube Tests.
- Deploy to SAP Commerce Cloud.
- Copy Build artifacts as zip file.
- Publish Artifacts.
- So lets start adding tasks onto our first AzureDevOps CI Pipeline. First step is to extract zip files from the code repository so i am going to add Extract task.
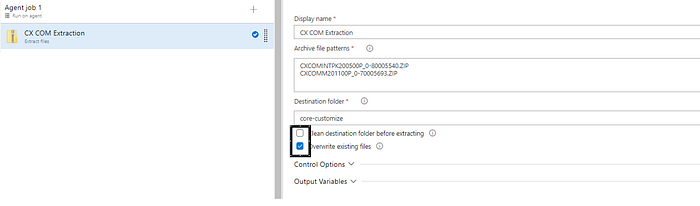
Provide the archive file patterns which needs to be extracted, so in my case i added both CX zip files
Add Destination folder as “Core customize”.
Make sure to uncheck “Clean Destination folder before extracting” and select “Overwrite existing files”.
2. Now we need to perform similar extract operation on “Cloudhotfolder” zip file.
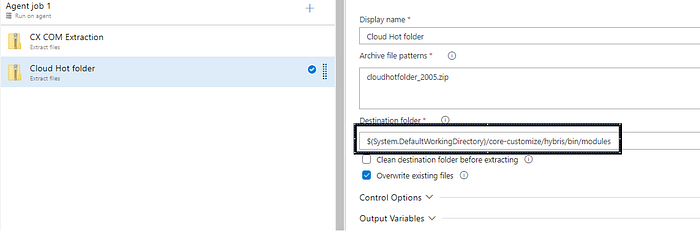
So i have provided zip file name which needs to be extracted, the reason for separating out this task from previous one is because as it is going to generate “Dist” folder which is specifically used by Spartacus project. That's the reason i have selected the destination folder as “$(System.DefaultWorkingDirectory)/core-customize/hybris/bin/modules”
3. Next is we need to add task for Java installation, make sure it has to be minimum Java 11.
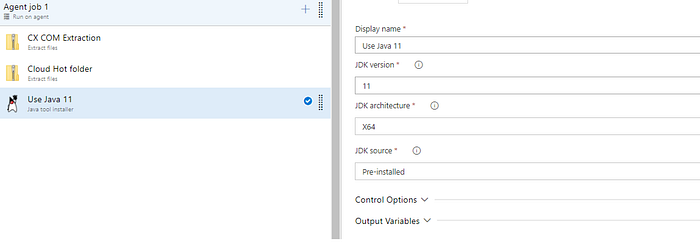
select JDK version as 11, with X64 architecture and JDK source as “pre-installed”.
4. Next step is before you start the actual SAP Hybris build we need to Set Ant environment. So i am going to use Bash task to perform the same. In our case I am going to use Inline script as it is easy to run.
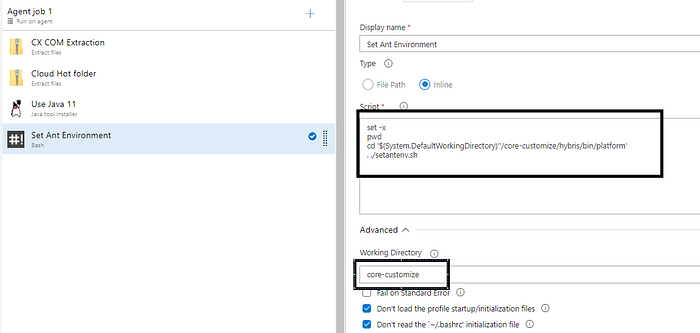
In this case first i am using “set-x” so that it enables a mode of the shell where all executed commands are printed to the terminal and easy for tracking (again it is a optional statement and good to have).
Another important thing to remember whenever you are running Bash script and calling Default working directory or Staging directory put a single quote before $ sign or it will throw an error.
so i am using it as
cd ‘$(System.DefaultWorkingDirectory)”/core-customize/hybris/bin/platform’
5. Next task is to run Ant customize command for SAP Hybris, so i am going to use bash script to perform this.
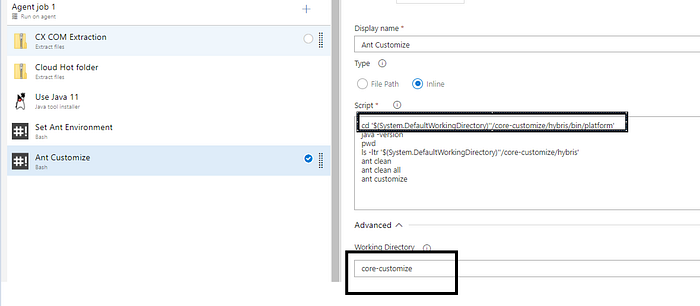
So in this case i am setting my Directory to go to below path as and then perform ANT operation.
cd ‘$(System.DefaultWorkingDirectory)’’/core-customize/hybris/bin/platform’
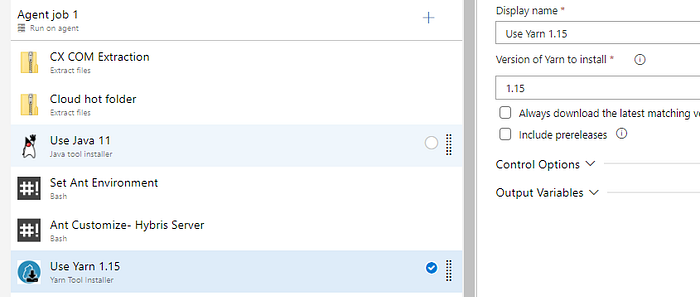
6. Next we need to install YARN for SAP Commerce Cloud, as its a pre-requisite to build application binaries.
Make sure to use ~1.15 version or higher.
7. Next step is to Add SAP Commerce(Spartacus) build task.
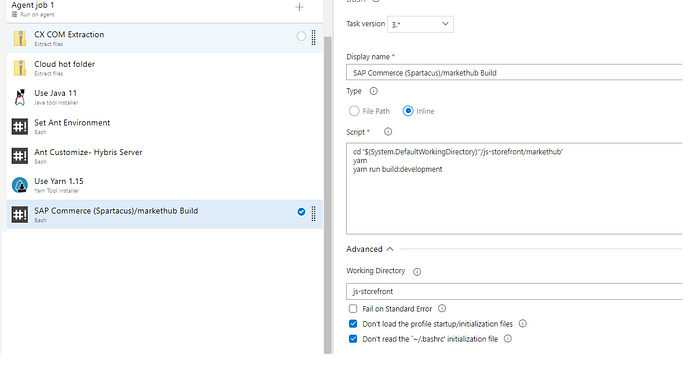
make sure to go “js-storefront/markethub” path to run “Yarn” command, so in my case i am using
cd ‘$(System.DefaultWorkingDirectory)’’/js-storefront/markethub’
after that add below commands
yarn
yarn run build:development
make sure you select your working directory as “js-storefront”.
8. Next step is to run “ant production” command
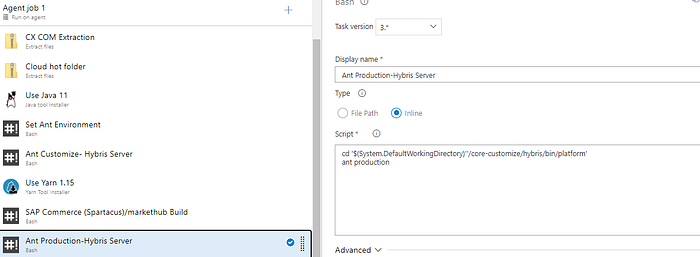
cd ‘$(System.DefaultWorkingDirectory)’’/core-customize/hybris/bin/platform’
ant production
Tasks 1–8 are mandatory in order to generate any SAP Hybris and SAP Commerce cloud artifacts.
from task 9–11 are a part of Continuous Automation/Testing.
9. Next task is to Integrate Junit testing as a part of Continuous Testing, so i have added Bash script task. In order to run JUnit tests first i am going to bin/platform folder path and then setting ant environment. later i am executing ant unit tests command.

set -x
pwd
cd ‘$(System.DefaultWorkingDirectory)’’/core-customize/hybris/bin/platform’
. ./setantenv.sh
ant unittests -Dtestclasses.packages=com.org.mh*
10. Next task is to add and run Integration tests, please add Bash task.
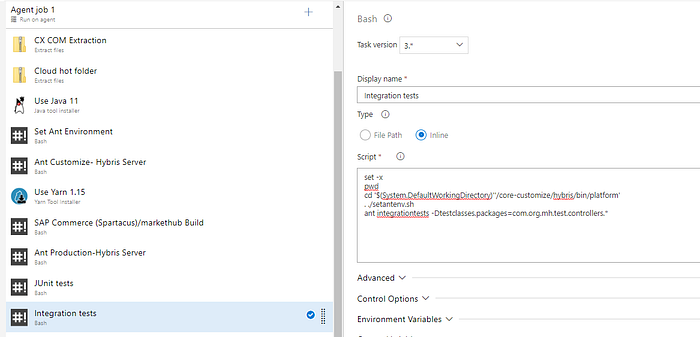
set -x
pwd
cd ‘$(System.DefaultWorkingDirectory)’’/core-customize/hybris/bin/platform’
. ./setantenv.sh
ant integrationtests -Dtestclasses.packages=com.org.mh.test.controllers.*
11. Next task is to check Code Quality and Code coverage using SonarQube. So again i am using Bash task and Added below statements to execute the task.
set -x
pwd
cd ‘$(System.DefaultWorkingDirectory)’’/core-customize/hybris/bin/platform’
. ./setantenv.sh
ant customize
ant sonarcheck -Dsonar.branch.name=prashanth_testbranch
make sure to set your working directory as “core-customize” so that SonarQube can pick your repo and give results.

finally i am using Copy files task to save outputs and then publishing it, so that we can pick it up for “Continuous Deployment” pipeline.

in task please provide your source folder and target folder (it can vary based on your environment).

this task will extract and then copy all zip files to Hybris folder.
12. Next task is to copy files for SAP Commerce Cloud (spartacus).

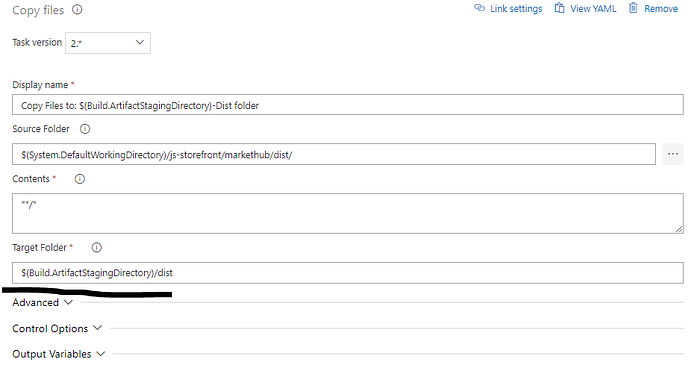
Source folder: $(System.DefaultWorkingDirectory)/js-storefront/markethub/dist/
Target folder: $(Build.ArtifactStagingDirectory)/dist
the Only difference between SAP Hybris and SAP Commerce Cloud copy task is on SAP Hybris i am just copying .zip files and in SAP Commerce Cloud task i am copying everything from Dist folder.
13. Finally Publishing artifacts, and i am using Publish artifacts task.


Let’s check the final generated artifacts → i just clicked on successful completed job → on the top you have an option of published artifacts.

So you can see under Hybris it has 4 required zip files and Under Dist it has all required files and folders which are required for SAP Commerce (Spartacus).
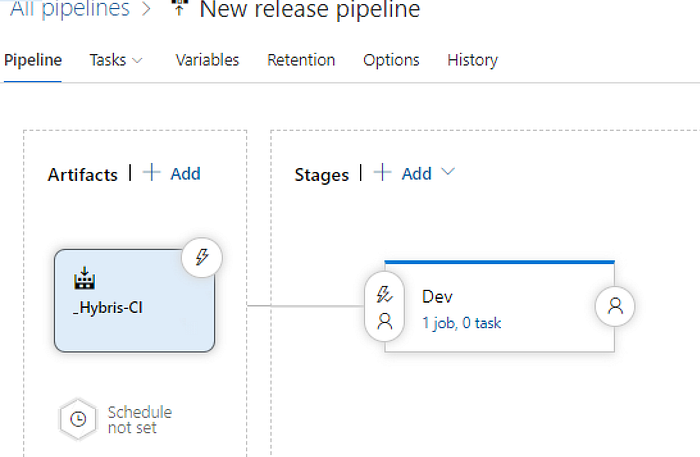
Continuous Deployment
for Continuous deployment there are few pre-requisites needs to be done.
- As i am pushing code from AzureDevOps to Linux servers which are hosted on Azure so i have installed AzureDevOps agent on Linux server.
- Either it can be done using Deployment group.
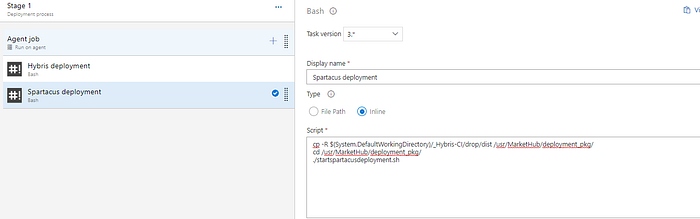
- First task I have added with Bash script where am executing shell script which will unpack the files and deploy it accordingly.
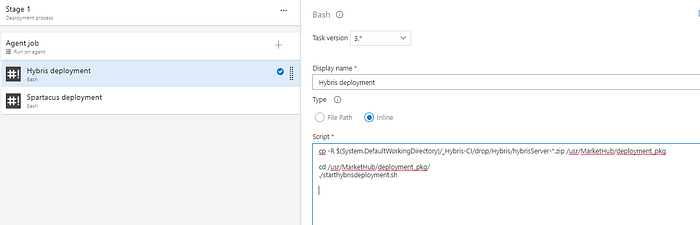
cp -R $(System.DefaultWorkingDirectory)/_Hybris-CI/drop/Hybris/hybrisServer-*.zip /usr/MarketHub/deployment_pkg
cd /usr/MarketHub/deployment_pkg/
./starthybrisdeployment.sh
starthybrisdeployment.sh files following commands, so i just added at as single shell script.
cat hybris_deployment.sh
#!/bin/bash
cd /usr/Hybris/core-customize/hybris/bin/platform
. ./setantenv.sh
./shutdown.sh
./hybrisserver.sh stop
cd /usr/Hybris/core-customize
dt=$(date +”%m%d%Y%H%M”) → this task will take backup
tar -cvzf hybris_$dt.tar.gz hybris
cd /usr/Hybris/core-customize/hybris/
unzip -o /usr/Hybris/deployment_pkg/hybrisServer-Platform.zip
unzip -o /usr/Hybris/deployment_pkg/hybrisServer-AllExtensions.zip
unzip -o /usr/Hybris/deployment_pkg/hybrisServer-Config.zip
unzip -o /usr/Hybris/deployment_pkg/hybrisServer-Licence.zip
chmod -R 775 /usr/Hybris/
cd /usr/Hybris/core-customize/hybris/bin/platform
. ./setantenv.sh
ant clean all
ant server
ant deploy
nohup ./hybrisserver.sh start & → this task will create a new service
2. Second task i have added with another Bash script which will copy dist files/folders from
cp -R $(System.DefaultWorkingDirectory)/_Hybris-CI/drop/dist /usr/MarketHub/deployment_pkg/
cd /usr/MarketHub/deployment_pkg/
./startspartacusdeployment.sh
startspartacusdeployment.sh file consists of following commands:
val1=$(ps -aux | grep “yarn” | grep “development” | awk ‘{print $2}’)
val2=$(netstat -tunlp | grep 9002 | awk ‘{print $7}’ |awk -F ‘/’ ‘{print $1}’)
echo “Stopping the Spartacus”
kill -9 $val1 $val2
dt=$(date +”%m%d%Y%H%M”) → taking backup of existing files
cd /usr/Spartacus/js-storefront/markethub
tar -cvzf dist_$dt.tar.gz dist
cp -pr /usr/Spartacus/deployment_pkg/dist /usr/Spartacus/js-storefront/markethub/.
cd /usr/Spartacus/js-storefront/markethub
yarn -version
yarn install
nohup yarn start — configuration=development — ssl &
Validation
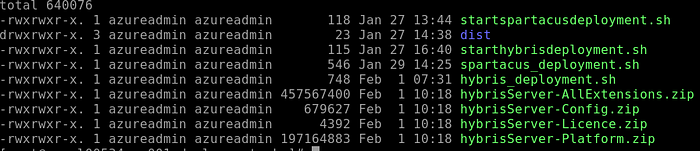
for final validation i will login to my Linux server and go to the path where i am copying all required files before i extract.
So in my case “/usr/Markethub/deployment_pkg”

now if run “ls-ltr” it will show all my latest files.
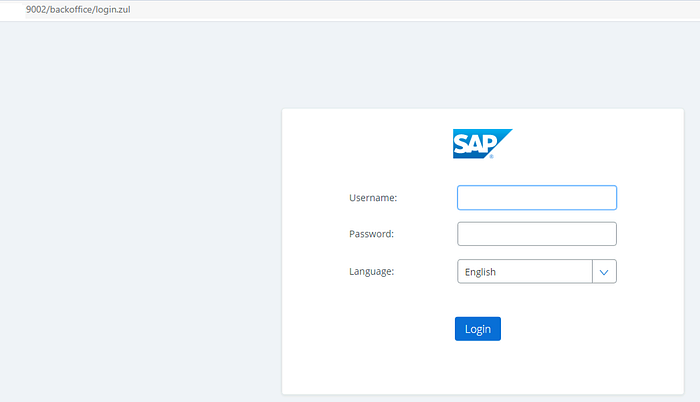
Now lets try to launch Hybris admin console from your browser

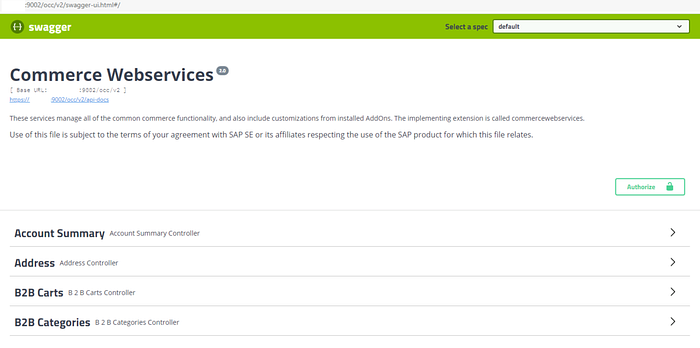
Also try to open Swagger and BackOffice links as well to make sure they are also opening.
Feel free to drop your comments.